Cart
Your shopping cart is empty!


![]()
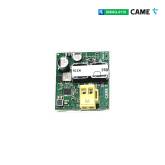
SRD-05VDC-SL-C TIMER 5V 12V TIMER CARD MODULE WITH 1 RELAY AND MORE FUNCTIONS
Power supply: 6-12V or with 5V micro USB port
Clean relay contacts, i.e. by powering the board alone, there is no voltage on the relay output contacts.
Max absorption 50mA
Max current on relay contacts: 5A
Reverse polarity protection
Dimensions: 63x38x20mm
To enter the programming phase, press the SET button for 5 seconds.
Then with the UP and DOWN buttons it will be possible to select the desired function.
Once the function has been selected, press set again to pass to the next phase of setting the times and cycles according to the operation
chosen.
In this phase, to move to the setting of the various times and cycles, the SET button must be pressed for 1s.
Pressing SET for 5 seconds will return to the function selection and pressing SET again will save the parameters set.
The relay ON closing time will be the OP time that will appear on the board.
The OFF opening times of the relay will be the CL time which will appear on the board.
On the board there is a STOP button that allows you to set the board on OFF or ON mode
After a few minutes of inactivity, the card goes into standby.
The saved settings will not be lost if the power is turned off.
Functions:
P.1.1 Only the OP time is set, ie the relay activation time.
At the power supply, the relay is OFF as soon as we apply the trigger signal the card starts with the count and the relay is ON, i.e. active for an
OP time.
If we apply a new trigger signal during the count, this takes effect during the operation.
P.1.2 Only the OP time is set, ie the relay activation time.
At the power supply, the relay is OFF as soon as we apply the trigger signal the card starts with the count and the relay is ON, i.e. active for an
OP time.
If during the count we apply a new trigger signal, this restarts the count from the beginning. P.1.3 Only the OP time is set, ie the relay activation
time.
At the power supply the relay is OFF as soon as we apply the trigger signal the card starts with the count and the relay is ON, i.e. active for an
OP time.
If during the count we apply a new trigger signal this stops the count and the relay immediately returns to OFF. P.2 The OP and CL times are
set, respectively for Relay ON activation and Relay OFF de-excitation.
If during the count we apply a new trigger signal, this restarts the count from the beginning. P.3.1 The OP and CL times are set, respectively for
Relay ON ON and Relay OFF OFF and the LOP repetition cycles. To start the count, a trigger signal must be applied to the board.
If during the count we apply a new trigger signal this stops the count and the relay immediately returns to OFF. P.3.2 The OP and CL times are
set, respectively for relay activation ON and relay OFF de-excitation and the LOP repetition cycles.
As soon as it is powered, the count starts and if during the count we apply a new trigger signal this has no effect on the operation. P.4 Only the
OP time is set, ie the relay activation time.
At the power supply the relay is OFF as soon as we apply the trigger signal the card starts with the count and the relay is ON, i.e. active for an
OP time. If during the count we apply a new trigger signal this stops the count and the relay immediately returns to OFF.
During the time setting phase, by pressing STOP it is possible to choose the time scale: XXX. from 1 to 999 seconds. XX. X ¸ 0.1 to 99.9 seconds
X. X. X. 1 to 999 minutes.
EXAMPLE: I want the relay to energize for 5s, de-energize for 10s and this operation to be repeated 3 times.
I press SET for 5s and press UP until P3.1 appears, I repeat SET, OP appears and I press UP until 5 appears,
I repeat SET, CL appears and I press UP until I see 10, Press SET, LOP appears and I press UP until I see 3,
I repeat SET for 5s and P3.1 appears, I release the SET button and wait a few seconds.
The settings you have made are saved.
Now to start the count I apply a trigger signal and start the operation with the parameters set.
Get you orders delivered faster with our partner UPS
Get technical assistance by experts in the fields
Something's wrong? Easily return products within 14 days
Do not miss updates with our live tracking

![]()
Adtecno.com © Specialist Tecnology s.r.l.
Via Danimarca 36A 90146, Palermo (PA), Italy. - VAT: 05437900821